Table of contents
Install Git on macOS
Section 1: Checking your version of Git
Open a new Terminal to type and run the following command to see if you already have Git installed. This will also check the installed version:
$ git --version
If you got an error and Git is not recognized by your machine, then follow Section 2 to install it.
Section 2: Using brew package manager to install Git
There are several options for installing Git on macOS. Note that any non-source distributions are provided by third parties and may not be up to date with the latest source release.
In this tutorial, we will use Homebrew, a package manager in macOS, to install Git. If you don’t like to use Homebrew, you can follow https://git-scm.com/download/mac to install Git in another way.
Note: if you encounter problems while installing Git using another way, the TA may not be able to help solve your problem.Follow the steps in the tutorial to install Homebrew if you don’t already have it. For more information about what Homebrew can do, visit the following link: https://brew.sh/.
Once Homebrew is installed, type the following in the terminal to update Homebrew and install Git.
$ brew update
$ brew install git
Please re-execute Section 1 to verify the installation is successful.
Section 3: First-time Git setup
First of all, if you encounter any problems in this section, please read the official GitHub tutorial first, which can solve most of your problems. https://docs.github.com/en/authentication/connecting-to-github-with-ssh
The first thing you should do when you install Git is set your username and email address. This is important because every Git commit uses this information, and it’s immutably baked into the commits you start creating:
$ git config --global user.name "<username>"
$ git config --global user.email <email>
Note: replace
<username>to your GitHub username, and<email>to the email address you used to register GitHub.If you want to know more about the Git config command, you can see here: https://git-scm.com/book/en/v2/Getting-Started-First-Time-Git-Setup.
Please read this tutorial to generate SSH keys. Print the public key, then please select and copy the output.
$ cat ~/.ssh/id_<algorithm>.pubPlease replace
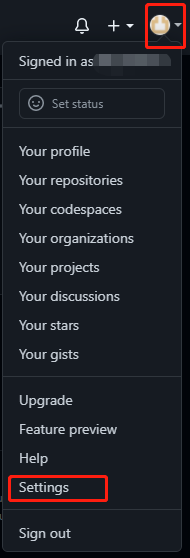
<algorithm>with a specific algorithm, such asrsa,ecdsa, ored25519. It depends on what algorithm you used to generate the SSH key.Open the GitHub website. In the upper-right corner of any GitHub page, click your profile photo, then click Settings.
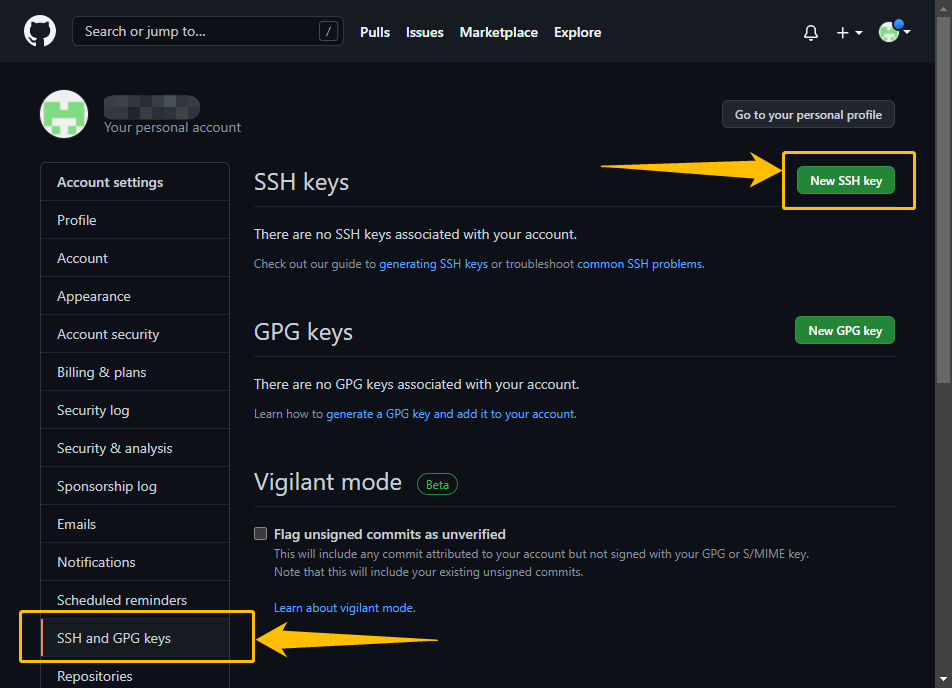
Then select the “SSH and GPG keys” section along the left-hand side. From there, click the “New SSH key” button.
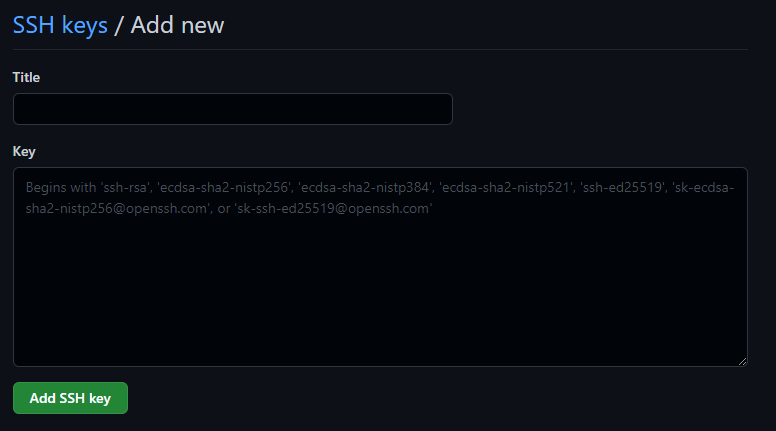
In the “Title” field, add a descriptive label for the new key. For example, if you’re using a personal Mac, you might call this key “Personal MacBook Air”.
Paste the contents of the public-key file you coped in this section step 3 into the “Key” field and click “Add key”.
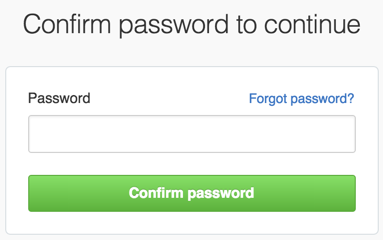
If prompted, confirm your GitHub password.
To test your SSH connection, enter the following in your terminal:
$ ssh -T git@github.com
# You may see a warning like this:
The authenticity of host 'github.com (IP ADDRESS)' can't be established.
RSA key fingerprint is SHA256:nThbg6kXUpJWGl7E1IGOCspRomTxdCARLviKw6E5SY8.
Are you sure you want to continue connecting (yes/no)?
Verify that the fingerprint in the message you see matches GitHub’s SSH key fingerprints. If it does, then type
yesand press enter:Hi your_GitHub_username! You've successfully authenticated, but GitHub does not provide shell access.Verify that the resulting message contains your GitHub username. If you receive a “permission denied” message, see “Error: Permission denied (publickey)”.
Install Git on Windows
Section 1: Installing Git for Windows
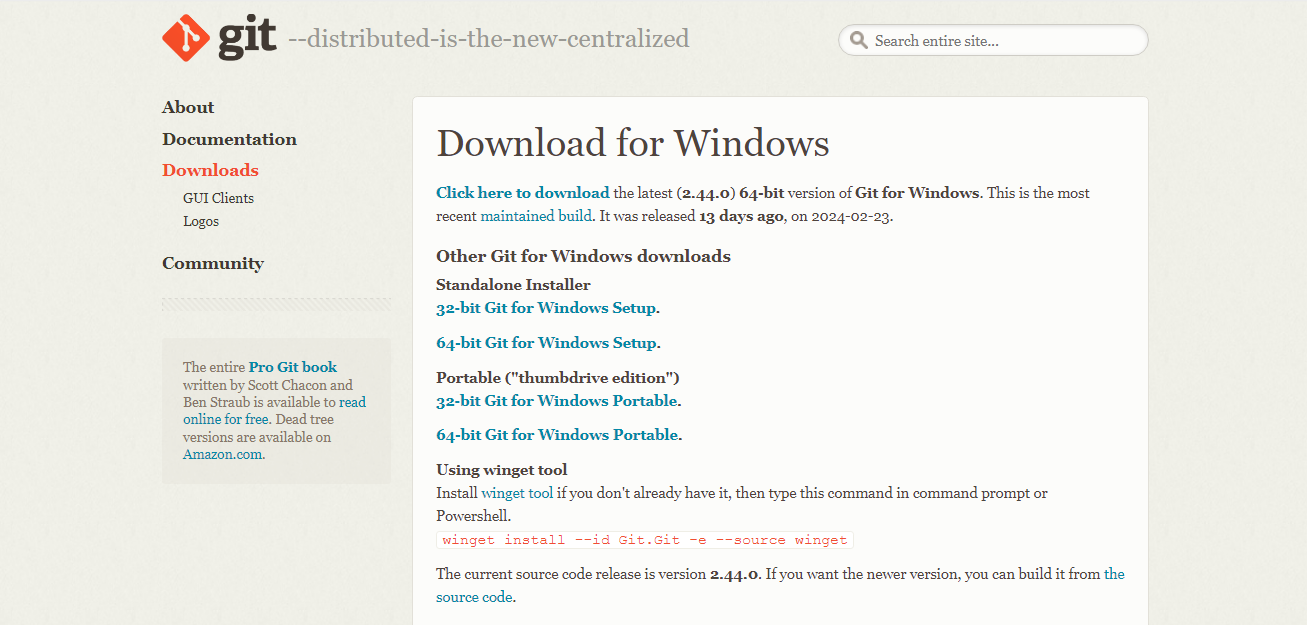
- Visit https://git-scm.com/download/win and click on the first link: “Click here to download”.
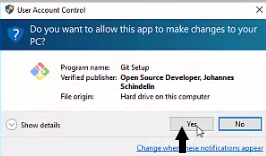
Open the file that was downloaded.
Choose yes to allow the Git installation on your PC.
Go through the installation and choose the default options.

For this step, we will choose the last option to give us extra commands to use.
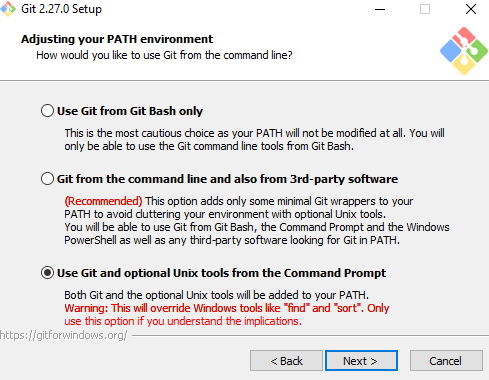
For the rest of the installation, choose the default options.
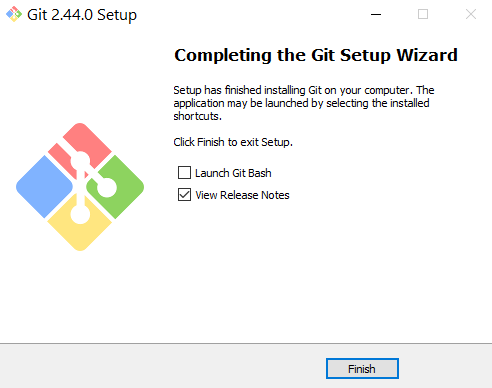
Uncheck “View Release Notes” because we do not need it.
Section 2: Testing the Git installation
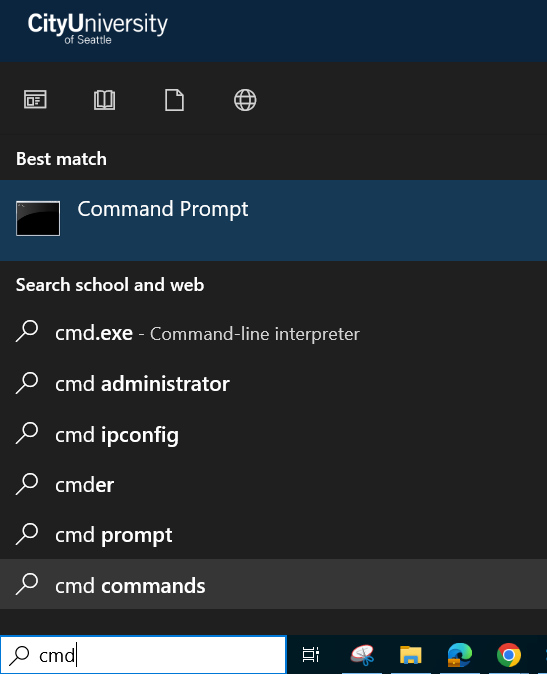
Once the installation is completed, open cmd.
In the search bar, type cmd and choose Command Prompt.
In the cmd window, type
git --version. You should see Git version 2.27.0 or greater.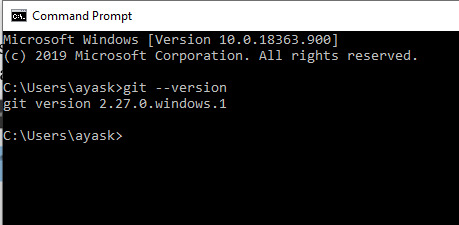
Note: If you get the following error:

Then, you need to add the PATH of Git into the Environment Variables.
In the cmd window, type “
where git”: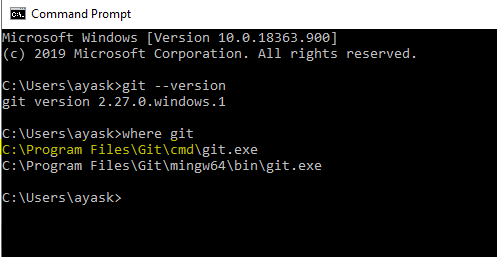
Copy the first line and add it to the environment variables.
To open the environment variables in the search bar, type environment variables and choose “Edit the system environment variables”.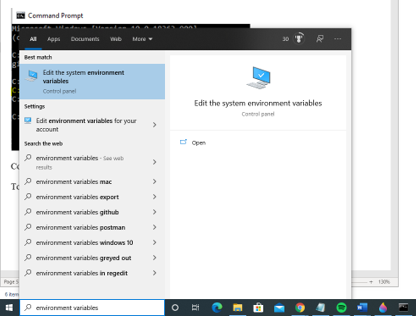
Choose Environment Variables.
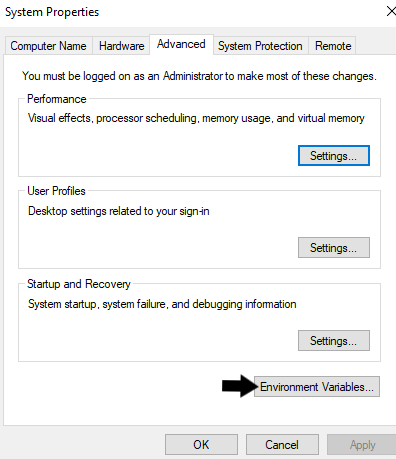
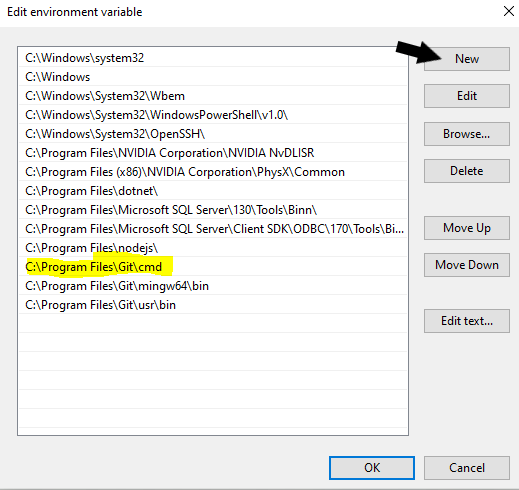
In the System Variables, choose Path, then select the Edit Button.

Choose New, then Paste the Git location that you copied from the cmd window.
Close the cmd window, then open it one more time and type
git --versionto make sure that Git installed successfully.
Section 3: First-time Git setup
First of all, if you encounter any problems in this section, please read the official GitHub tutorial first, which can solve most of your problems. https://docs.github.com/en/authentication/connecting-to-github-with-ssh
Open PowerShell or Git Bash. If you don’t know what a terminal is, check out the tutorial What’s the Terminal?
The first thing you should do when you install Git is set your username and email address. This is important because every Git commit uses this information, and it’s immutably baked into the commits you start creating:$ git config --global user.name "<username>" $ git config --global user.email <email>Note: replace
<username>to your GitHub username, and<email>to the email address you used to register GitHub.If you want to know more about the Git config command, you can see here: https://git-scm.com/book/en/v2/Getting-Started-First-Time-Git-Setup.
Please read this tutorial to generate SSH keys. Print the public key, then please select and copy the output.
$ cat ~/.ssh/id_<algorithm>.pubPlease replace
<algorithm>with a specific algorithm, such asrsa,ecdsa, ored25519. It depends on what algorithm you used to generate the SSH key.Open the GitHub website. In the upper-right corner of any GitHub page, click your profile photo, then click Settings.
Then select the “SSH and GPG keys” section along the left-hand side. From there, click the “New SSH key” button.
In the “Title” field, add a descriptive label for the new key. For example, if you’re using a personal Mac, you might call this key “Personal MacBook Air”.
Paste the contents of the public-key file you coped in this section step 3 into the “Key” field and click “Add key”.
If prompted, confirm your GitHub password.
To test your SSH connection, enter the following in your terminal:
$ ssh -T git@github.com
# You may see a warning like this:
The authenticity of host 'github.com (IP ADDRESS)' can't be established.
RSA key fingerprint is SHA256:nThbg6kXUpJWGl7E1IGOCspRomTxdCARLviKw6E5SY8.
Are you sure you want to continue connecting (yes/no)?
Verify that the fingerprint in the message you see matches GitHub’s SSH key fingerprints. If it does, then type
yesand press enter:Hi your_GitHub_username! You've successfully authenticated, but GitHub does not provide shell access.Verify that the resulting message contains your GitHub username. If you receive a “permission denied” message, see “Error: Permission denied (publickey)”.