Generating an SSH key
All operations in this tutorial are based on the terminal. If you don’t know what a terminal is, check out the tutorial What’s the Terminal?
The Secure Shell (SSH) Protocol is a cryptographic network protocol for operating network services securely over an unsecured network. Using the SSH protocol, you can connect and authenticate to remote servers and services.
Table of contents
- Considerations
- Checking for existing SSH keys
- Generating a new SSH key
- Adding your SSH key to the
ssh-agent
Considerations
Windows
Windows 10 / 11; Windows Server 2019 / 2022
If you are using Windows 10, you first need to check your Windows version.
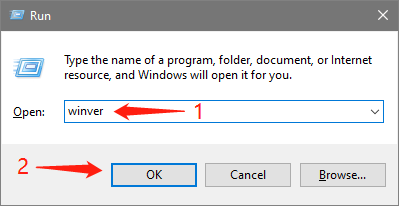
Press the Win key and the R key at the same time to open the run window, enter winver in the window and press Enter, you can see the Windows version you are using in the pop-up window.
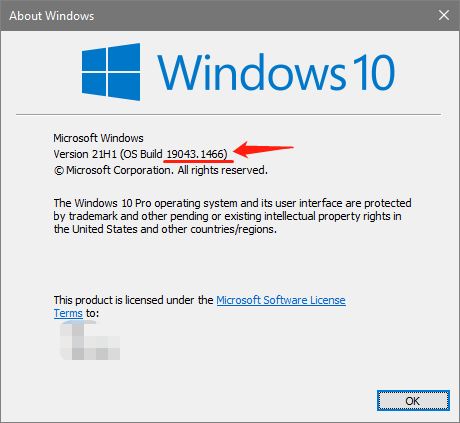
Microsoft integrated OpenSSH into Windows 10 starting with build 1709. But not stable until the build 1809 and later. If your version is between 1709 and 1809, try to do your own research on how to use it after completing this section. Or you can check out the next section to use SSH from Git Bash. If your version is lower than 1709, please go directly to the next section.
Install OpenSSH using Windows Settings
This section will use the GUI method to install OpenSSH, if you want to install it through PowerShell, please check here.
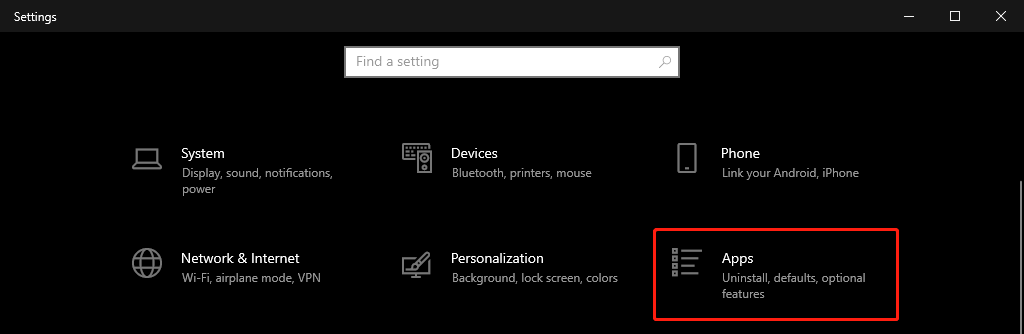
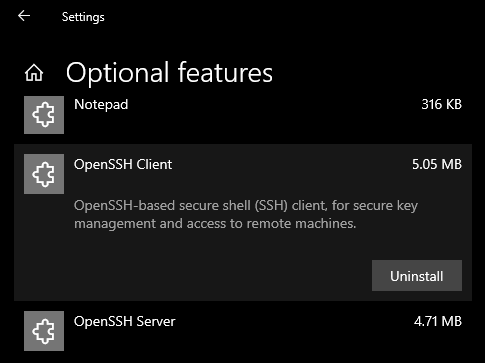
Open Settings, select Apps > Apps & Features, then select Optional Features.

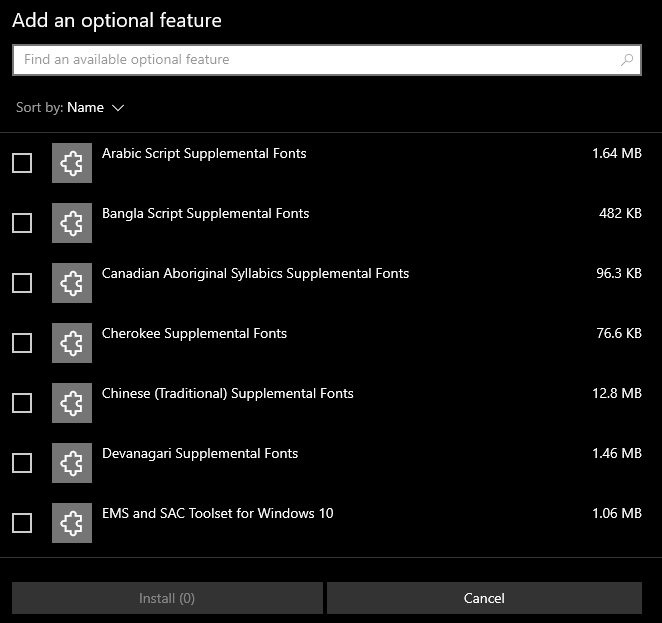
Scan the list to see if the OpenSSH is already installed. If not, at the top of the page, select Add a feature, then:
- Find OpenSSH Client, then click Install
- Find OpenSSH Server, then click Install

Once setup completes, return to Apps > Apps & Features and Optional Features and you should see OpenSSH listed.
To verify that SSH is working, open a command line and type ssh or ssh -V, if you do it correctly, you will get the following output:
$ ssh
usage: ssh [-46AaCfGgKkMNnqsTtVvXxYy] [-B bind_interface]
           [-b bind_address] [-c cipher_spec] [-D [bind_address:]port]
           [-E log_file] [-e escape_char] [-F configfile] [-I pkcs11]
           [-i identity_file] [-J [user@]host[:port]] [-L address]
           [-l login_name] [-m mac_spec] [-O ctl_cmd] [-o option] [-p port]
           [-Q query_option] [-R address] [-S ctl_path] [-W host:port]
           [-w local_tun[:remote_tun]] destination [command]
$ ssh -V
OpenSSH_for_Windows_8.1p1, LibreSSL 3.0.2
Windows 7 / 8; Other Windows
You can completely use PuTTY to complete SSH-related operations, but considering the popularity of PuTTY and the difficulty of PuTTY-related tutorials, here we will use Git Bash to operate.
Git Bash is a BASH emulation installed by default during Git installation. If you haven’t installed Git, please follow this tutorial to install it. To access the Git Bash, you can right-click on any folder (including the desktop) in Windows Explorer and select “Git Bash Here”, you can also find it in the Windows start menu:
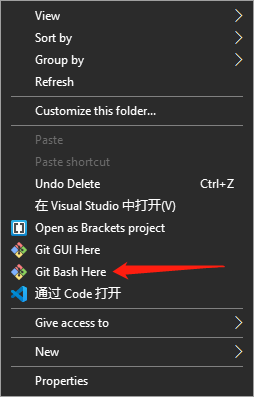
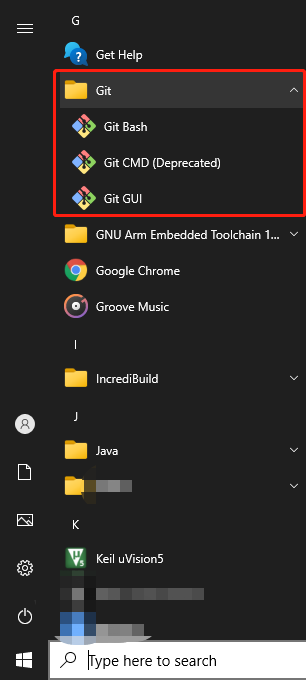
The first picture is the right-click menu, and the second is the start menu. Although the screenshots are for Windows 10 as examples, there are similar options in other Windows.
After open Git Bash, type ssh or ssh -V, if there is output like the following, then SSH is working fine:
$ ssh
usage: ssh [-46AaCfGgKkMNnqsTtVvXxYy] [-B bind_interface]
           [-b bind_address] [-c cipher_spec] [-D [bind_address:]port]
           [-E log_file] [-e escape_char] [-F configfile] [-I pkcs11]
           [-i identity_file] [-J [user@]host[:port]] [-L address]
           [-l login_name] [-m mac_spec] [-O ctl_cmd] [-o option] [-p port]
           [-Q query_option] [-R address] [-S ctl_path] [-W host:port]
           [-w local_tun[:remote_tun]] destination [command]
$ ssh -V
OpenSSH_8.1p1, OpenSSL 1.1.1d  10 Sep 2019
Depending on the version of Git and SSH, the output will differ slightly.
macOS
macOS already comes with SSH software to complete this tutorial. However, for security reasons, it is recommended to update SSH for better security.
- You can avoid using the old one that comes with the system by installing the latest one via Homebrew. If you don’t have Homebrew, you can find the Homebrew installation tutorial here.
- Or you can update the entire OpenSSH suite.
Checking for existing SSH keys
Before you generate an SSH key, you can check to see if you have any existing SSH keys.
Open Terminal. If you are Windows OS, open PowerShell or Git Bash.
Enter
ls ~/.sshto see if existing SSH keys are present.$ ls ~/.ssh # Lists the files in your .ssh directory, if they existCheck the directory listing to see if you already have a public SSH key. The file with the .pub extension is the public key, and the file without the extension is the private key. For information security, please do not share the private key on the Internet. By default, the filenames of supported public keys for GitHub are one of the following.
- id_rsa.pub
- id_ecdsa.pub
- id_ed25519.pub
Tip: If you receive an error that
~/.sshdoesn’t exist, you do not have an existing SSH key pair in the default location. You can create a new SSH key pair in the next section.Note: GitHub is improving security by dropping older, insecure key types.
DSA keys (
ssh-dss) are no longer supported. Existing keys will continue to function through March 15, 2022. You cannot add new DSA keys to your user account on GitHub.com.RSA keys (
ssh-rsa) with avalid_afterbefore November 2, 2021 may continue to use any signature algorithm. RSA keys generated after that date must use a SHA-2 signature algorithm. Some older clients may need to be upgraded in order to use SHA-2 signatures.If you already have an SSH key that you can use, you can choose to continue with the steps in the next section to generate a new SSH key. Make a backup if you don’t want to overwrite the new key over the old one.
Generating a new SSH key
If you don’t have an existing public and private key pair, type the following command to generate a new SSH Key. Note: replace <email> with the email address you used to register GitHub.
$ ssh-keygen -t ed25519 -C "<email>"
Note: If you are using a legacy system that doesn’t support the Ed25519 algorithm, use:
$ ssh-keygen -t rsa -b 4096 -C "<email>"
Example output:
Generating public/private <algorithm> key pair.
When you’re prompted to “Enter a file in which to save the key,” press Enter. This accepts the default file location.
Enter file in which to save the key (/home/your username/.ssh/id_<algorithm>): [Press Enter]
Created directory '/home/your username/.ssh'.
At the prompt, type a secure passphrase. You can enter the password, but Git will ask you to enter this password every time you connect to the remote server (GitHub). If you choose to use a password, you can use ssh-agent to avoid re-entering the password in a short time. If you are using your own computer, it is recommended to keep it empty (press Enter directly).
Enter passphrase (empty for no passphrase): [Press Enter or Type a passphrase]
Enter same passphrase again: [Press Enter or Type a passphrase]
Your identification has been saved in /home/your username/.ssh/id_<algorithm>.
Your public key has been saved in /home/your username/.ssh/id_<algorithm>.pub.
The key fingerprint is:
When you’re done, remember the section Checking for existing SSH keys to check your existing SSH keys at any time.
Adding your SSH key to the ssh-agent
If you did not enter passphrase when generating the SSH key, you can skip this section.
Since the configuration of ssh-agent is different for each operating system, due to the length of the article, please read the official GitHub tutorial for details to configure your ssh-agent according to your OS:
Generating a new SSH key and adding it to the ssh-agent: https://docs.github.com/en/authentication/connecting-to-github-with-ssh/generating-a-new-ssh-key-and-adding-it-to-the-ssh-agent
Working with SSH key passphrases: https://docs.github.com/en/authentication/connecting-to-github-with-ssh/working-with-ssh-key-passphrases