Install MongoDB
Table of contents
- Version numbers may not match with the most current version at the time of writing. If given the option to choose between stable release (long-term support) or most recent, please select the stable release rather than the beta-testing version.
- There might be subtle discrepancies along with the steps. Please use your best judgment while going through this cookbook-style tutorial to complete each step.
Detect if MongoDB is installed
Open a terminal. If you don’t know what a terminal is, read the tutorial What’s the Terminal?. Enter the command mongo or mongosh.
If you have MongoDB installed, you will enter the MongoDB shell. Press Ctrl + C (or Command + C in macOS) to exit the shell.
If you are using Windows, it is possible that the command execution failed because your environment variables were not configured correctly. Please check File Explorer to see if the path C:\Program Files\MongoDB\Server\5.0\bin\ exists. If it exists, skip to the Configure Environment Variables section to configure your environment variables. If not, proceed to install following the tutorial.
For Windows Users
This section is based on the official MongoDB documentation. You can also watch this video to install in Windows 10.
This tutorial only applies to 64-bit versions of Windows Server 2019 / Windows 10 / Windows Server 2016 on x86_64 architecture. For other Windows platforms, please do your personal research first, and if you really can’t find a solution ask your TA to find a solution with you.
Disable Hyper-V if you want to install MongoDB on Windows using VirtualBox.
Install MongoDB Community Edition
Follow these steps to install MongoDB Community Edition using the MongoDB Installer wizard.
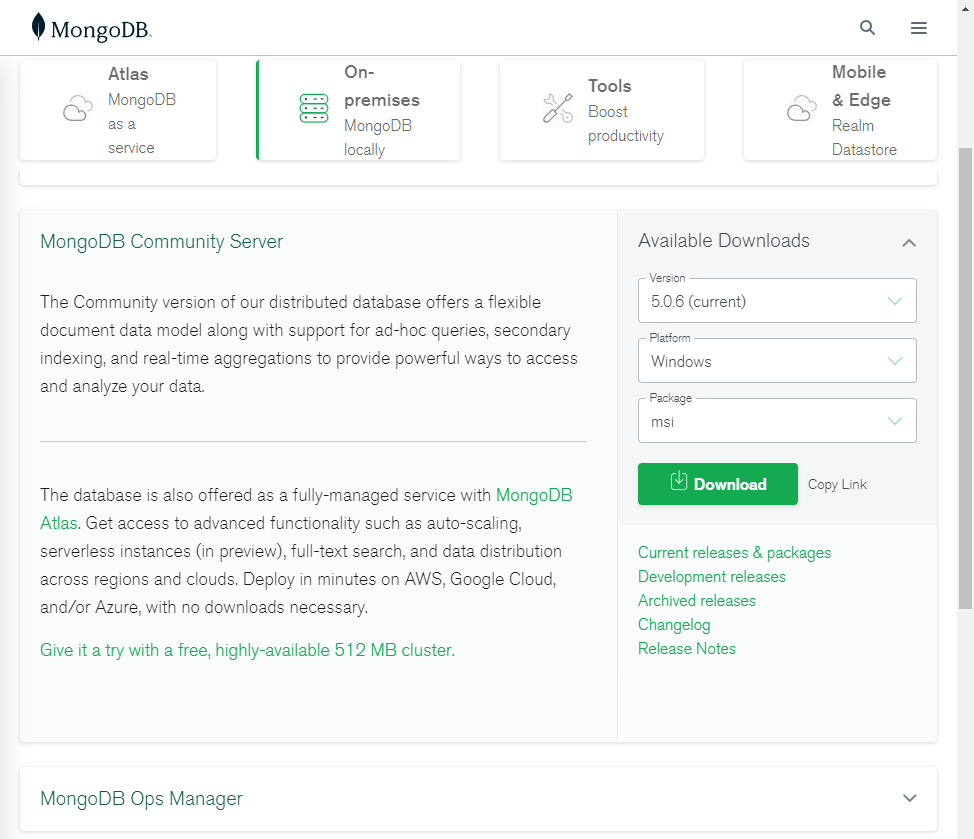
Download the MongoDB Community
.msiinstaller from the MongoDB Download Center.Please keep the
.msiinstaller after installation, this file is also used for uninstallation.- In the Version dropdown, select the newest version of MongoDB to download.
(As of Feb 4, 2022, the latest version is5.0.6.) - In the Platform dropdown, select
Windows. - In the Package dropdown, select
msi. - Click Download.
- In the Version dropdown, select the newest version of MongoDB to download.
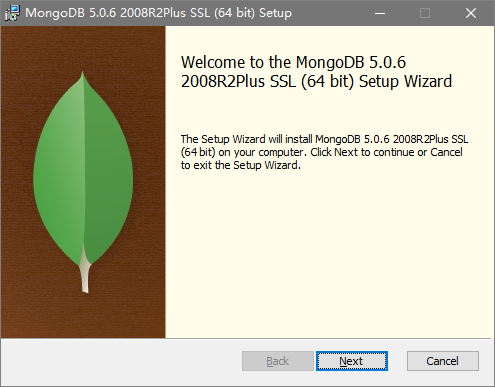
Run the MongoDB installer.
For example, from the Windows Explorer/File Explorer:
- Go to the directory where you downloaded the MongoDB installer (
.msifile). By default, this is yourDownloadsdirectory. - Double-click the
.msifile.
- Go to the directory where you downloaded the MongoDB installer (
Follow the MongoDB Community Edition installation wizard.
The wizard steps you through the installation of MongoDB and MongoDB Compass.
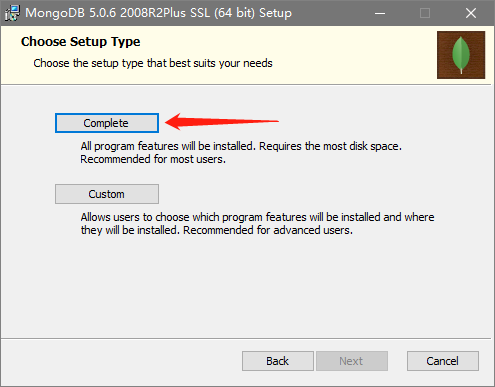
Choose Setup Type
You can choose either the Complete or Custom setup type. Please select Complete.
The Complete setup option installs MongoDB and the MongoDB tools to the default location. The Custom setup option allows you to specify which executables are installed and where.
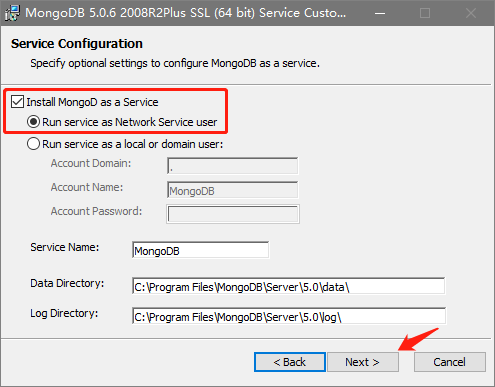
Service Configuration
Starting in MongoDB 4.0, you can set up MongoDB as a Windows service during the install or just install the binaries. Here let’s set it as a Windows service, and the MongoDB service will be started after successful installation.
- Select
Install MongoD as a Service. - Select
Run the service as Network Service user. - Other options are kept as default.
- Click
Next.
- Select
If you choose
Run the service as a local or domain user, to use it in your current Windows local account, keep the Account Domain as.; Account Name as your current account name; Account Password as the password for your current account (the username and password you use to log in to Windows). For a detailed explanation of these options, please read here and the official documentation.(Optional but recommended) To have the wizard install MongoDB Compass, select
Install MongoDB Compass(Default). MongoDB Compass is a graphical user interface (GUI) for MongoDB.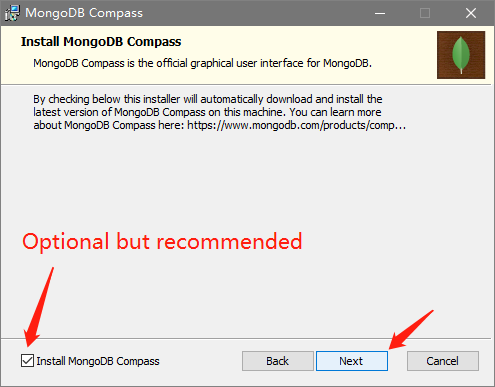
When ready, click
Install.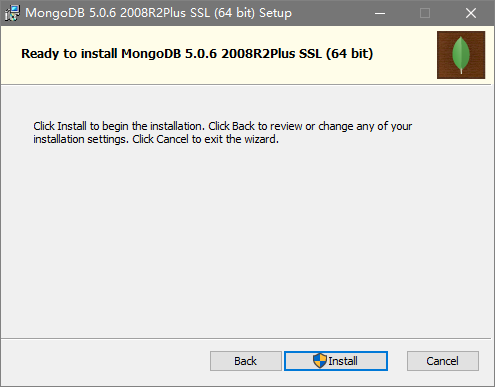
During the installation process, some prompts and related processing methods may appear as follows:
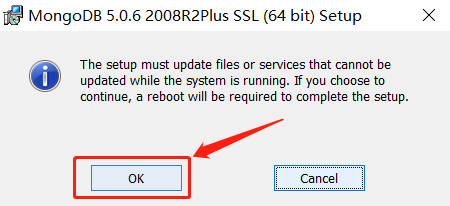
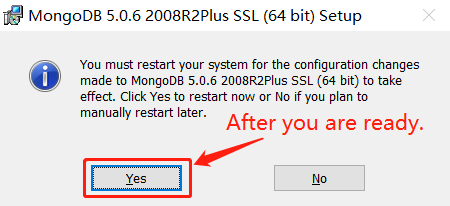
Just a reminder that you will need to restart your computer after the installation is complete, click OK.
This prompt may be that you have installed MongoDB and the MongoDB service is running. Here just check
Close the applications and attempt to restart them., then click OK.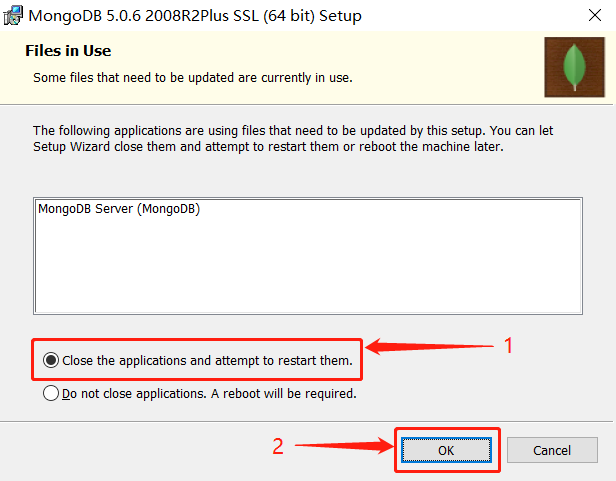
This prompts you to reboot. Please click Yes to restart your computer after making sure your other work (e.g. Word document, code being edited) is saved.
Configure Environment Variables
Once installed, open a new terminal and run mongo again. If you get an error like the one below, it means you didn’t set the environment variable. To exit mongo, press Ctrl + C.
# cmd
'mongo' is not recognized as an internal or external command,
operable program or batch file.
# PowerShell
mongo : The term 'mongo' is not recognized as the name of a cmdlet, function, script file, or operable program. Check the spelling of the name, or if a path was included, verify that the path is correct and try again.
# Git Bash
bash: mongo: command not found
# Z shell
zsh: command not found: mongo
Follow this tutorial to add a C:\Program Files\MongoDB\Server\5.0\bin\ value to your PATH environment variable.
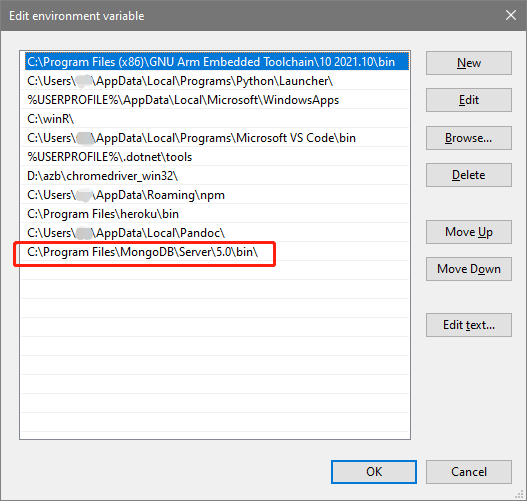
After you set the PATH environment variable, please open a new terminal, and run mongo again. If you did all the steps correctly, you can enter the MongoDB shell.
Install Tools
Install mongosh
This section is based on the official MongoDB documentation
The .msi installer does not include mongosh.
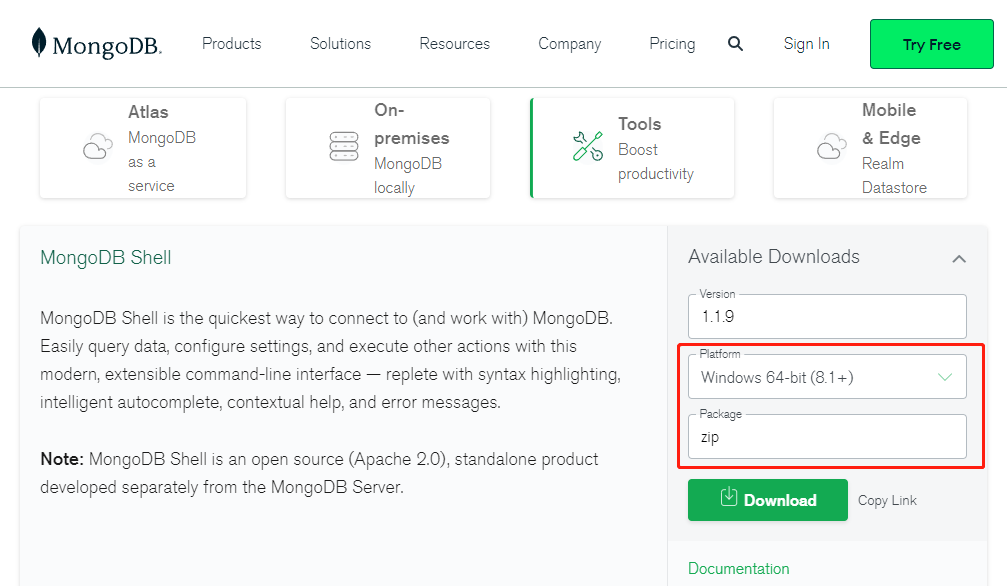
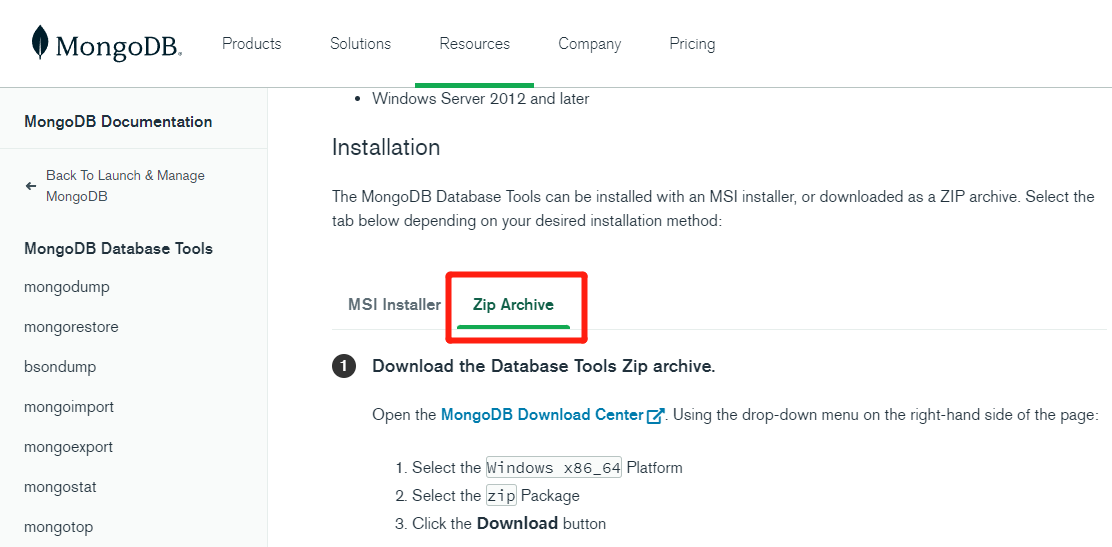
Open the MongoDB Shell download page: MongoDB Download Center
- In the Platform dropdown, select
Windows 64-bit (8.1+)(The first option, without the(MSI)suffix). - Make sure the Package item shows
zipand notmsi. - Click Download.
- In the Platform dropdown, select
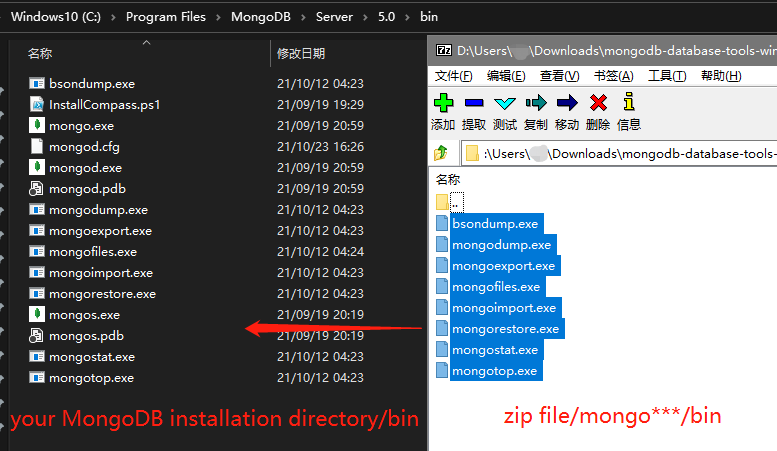
Once the download is complete, open or extract the zip archive. Extract the two executable files (
.exe) inmongosh-***/bin/in the zip file to thebindirectory of the MongoDB installation directory, which is located inC:\Program Files\MongoDB\Server\5.0\bin\by default.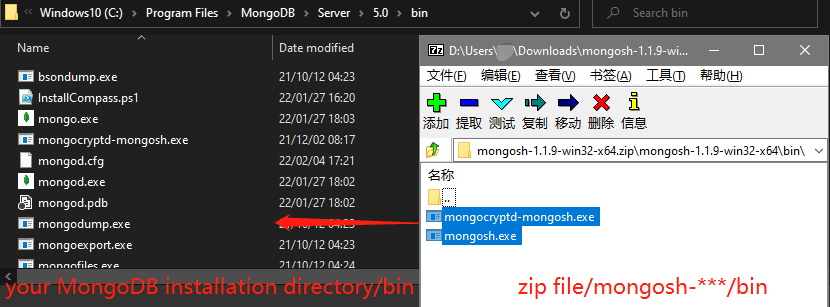
Open a new terminal and run
mongosh. Open a new terminal and run mongosh. If you did all the steps correctly, you can enter the MongoDB shell. To exit themongosh, pressCtrl+Ctwice.
Install MongoDB Database Tools
This section is based on the official MongoDB documentation.
The MongoDB Database Tools are a collection of command-line utilities for working with a MongoDB deployment. The Database Tools include binaries mongodump, mongorestore, bsondump, mongoimport, mongoexport, mongostat, mongotop, and mongofiles.
If you are missing these tools, please refer to here to install them. Please use the Zip Archive method to install, put the files in the bin folder in the zip archive into the bin directory in the MongoDB installation path, which is located in C:\Program Files\MongoDB\Server\5.0\bin\ by default.
For macOS Users
This section is based on the official MongoDB documentation.
Use this tutorial to install MongoDB 5.0 Community Edition on macOS using the third-party Homebrew package manager. MongoDB 5.0 Community Edition supports macOS 10.14 or later.
If you are using an older version of macOS, please install an older version of MongoDB Community. Please do your own research on how to install it, or use the version drop-down menu in the upper left corner of the current MongoDB document to select the documentation for that version.
Install MongoDB Community Edition
macOS does not include the Homebrew brew package by default. First you need to install Homebrew, follow the steps of this tutorial to install Homebrew.
Type the following in the terminal to update Homebrew.
$ brew updateTap the MongoDB Homebrew Tap to download the official Homebrew formula for MongoDB and the Database Tools, by running the following command in your macOS Terminal:
$ brew tap mongodb/brewIf you have already done this for a previous installation of MongoDB, you can skip this step.
To install MongoDB, run the following command in your macOS Terminal application:
$ brew install mongodb-community@5.0Alternatively, you can specify a previous version of MongoDB if desired. You can also maintain multiple versions of MongoDB side by side in this manner.
If you have previously installed an older version of the formula, you may encounter a ChecksumMismatchError. To resolve, see Troubleshooting ChecksumMismatchError.
Run MongoDB Community Edition
Follow these steps to run MongoDB Community Edition. These instructions assume that you are using the default settings.
You can run MongoDB as a macOS service using brew, or you can run MongoDB manually as a background process. It is recommended to run MongoDB as a macOS service, as doing so sets the correct system ulimit values automatically (see ulimit settings for more information).
To run MongoDB (i.e. the
mongodprocess) as a macOS service, run:$ brew services start mongodb-community@5.0To stop a
mongodrunning as a macOS service, use the following command as needed:$ brew services stop mongodb-community@5.0To run MongoDB (i.e. the
mongodprocess) manually as a background process, run:For macOS running Intel processors:
$ mongod --config /usr/local/etc/mongod.conf --forkFor macOS running on Apple M1 processors:
$ mongod --config /opt/homebrew/etc/mongod.conf --forkTo stop a
mongodrunning as a background process, connect to themongodusing mongosh, and issue theshutdowncommand as needed.
Both methods use the mongod.conf file created during the install. You can add your own MongoDB configuration options to this file as well.
macOS Prevents mongod From Opening
macOS may prevent
mongodfrom running after installation. If you receive a security error when startingmongodindicating that the developer could not be identified or verified, do the following to grantmongodaccess to run:
- Open System Preferences
- Select the Security and Privacy pane.
- Under the General tab, click the button to the right of the message about
mongod, labelled either Open Anyway or Allow Anyway depending on your version of macOS.
To verify that MongoDB is running, perform one of the following:
If you started MongoDB as a macOS service:
$ brew services listYou should see the service
mongodb-communitylisted asstarted.If you started MongoDB manually as a background process:
$ ps aux | grep -v grep | grep mongodYou should see your
mongodprocess in the output.
You can also view the log file to see the current status of your mongod process: /usr/local/var/log/mongodb/mongo.log.
Connect and Use MongoDB
To begin using MongoDB, connect mongosh to the running instance. From a new terminal, issue the following:
$ mongosh
macOS Prevents mongosh From Opening
macOS may prevent
mongoshfrom running after installation. If you receive a security error when startingmongoshindicating that the developer could not be identified or verified, do the following to grantmongoshaccess to run:
- Open System Preferences
- Select the Security and Privacy pane.
- Under the General tab, click the button to the right of the message about
mongosh, labelled either Open Anyway or Allow Anyway depending on your version of macOS.
For information on CRUD (Create, Read, Update, Delete) operations, see:
Using the MongoDB Database Tools
Starting in MongoDB 4.4.1, installing MongoDB via brew also installs the MongoDB Database Tools.
The MongoDB Database Tools are a collection of command-line utilities for working with a MongoDB deployment, including data backup and import/export tools like mongoimport and mongodump as well as monitoring tools like mongotop.
Once you have installed the MongoDB Server in the steps above, the Database Tools are available directly from the command line in your macOS Terminal application. For example you could run mongotop against your running MongoDB instance by invoking it in your macOS Terminal like so:
$ mongotop
It should start up, connect to your running mongod, and start reporting usage statistics.
See the MongoDB Database Tools Documentation for usage information for each of the Database Tools.
Resources
- What is MongoDB?: https://docs.mongodb.com/upcoming/#what-is-mongodb-
- Install MongoDB: https://docs.mongodb.com/guides/server/install/
- Install MongoDB Community Edition on Windows: https://docs.mongodb.com/manual/tutorial/install-mongodb-on-windows/
- Install MongoDB Community Edition on macOS: https://docs.mongodb.com/manual/tutorial/install-mongodb-on-os-x/
- The MongoDB Database Tools Documentation: https://docs.mongodb.com/database-tools/